

Authentication and authorization are both very important concepts in every platform and vRealize Automation is of no exception. As you know authentication is a matter of verifying if the user credentials is correct and confirms if the user is the one that pretends to be. Authorization happens after successful authentication and assigns the user the privileges that the user is entitled. In vRealize Automation, users are authorized through role assignment.

As I explained in vRealize Automation Architecture and Components, VMware Identity Manager is the platform that takes this responsibility through its SSO service.
VMware Identity Manager Architecture
Similar to all services in vRealize Automation, Identity service runs as pod in Kubernetes. When a user tries to log on to vRealize Automation portal, vRA automatically redirects the request to vIDM URL. Then vIDM checks the user credentials with Active Directory and allows the user to log on to vRA console.

Administrators can use vIDM to define access policies, such as mobile single sign-on (SSO) and multifactor authentication.
Directory Integration
As depicted above, the role of a centralized directory is very important here, and you need to integrate your enterprise directory with Identity Manager. The following directories are supported:
- Active Directory over LDAP.
- Active Directory, Integrated Windows Authentication.
- OpenLDAP directory.
Active Directory over LDAP
It is for those scenarios that only a single Active Directory domain environment is used. a simple bind authentication is used to connect it to vIDM.
Active Directory, Integrated Windows Authentication
use this option, if your environment is a multidomain/ or multiforest Active Directory. Integrated Windows Authentication is used to connect it to vIDM.
OpenLDAP
Just a single domain directory is supported with OpenLDAP. bear in mind that, vIDM only supports those implementations that paged searched queries is supported.
System Directory
It is created by default as a local directory during installation and the configuration admin user is also created here. You can create multiple local directories.
before getting started with Add Directory wizard. There are important concepts to take a note of.
vIDM connector: It is a component of vIDM service. This connector is the default option, third party identity providers are also available in case they supprt SAML 2.0 protocol. What this component does is as follows:
- Syncs users or groups from an integrated directory (MS AD or OpenLDAP) to the vIDM service.
- Authenticates users to vIDM service.
Worker: it’s a partition created for each integrated directory, meaning, there is a one to one mapping between a worker
Access Identity Manager Portal
Access the vIDM URL “https://<VMware_Identity_Manager_FQDN>/SAAS/admin.” and login with the configuration admin user created during the installation, here in our deployment we named it “vIDM-admin”, this user is assigned the Super Admin role and has full administrator access in vIDM.

Click Identity & Access Management to start integrating a new directory.

All current local and integrated directories are listed here. As shown, the default System Directory is the only one here. Click Add Directory to start the process.
Give a name for the directory name and select Active Directory (Integrated Windows Authentication). In the Sync Connector select your vIDM instance and select Yes for authentication. (if a third party provider is used, click No)
for the Directory Search Attribute select UPN or SAM Account Name. here I select UPN.

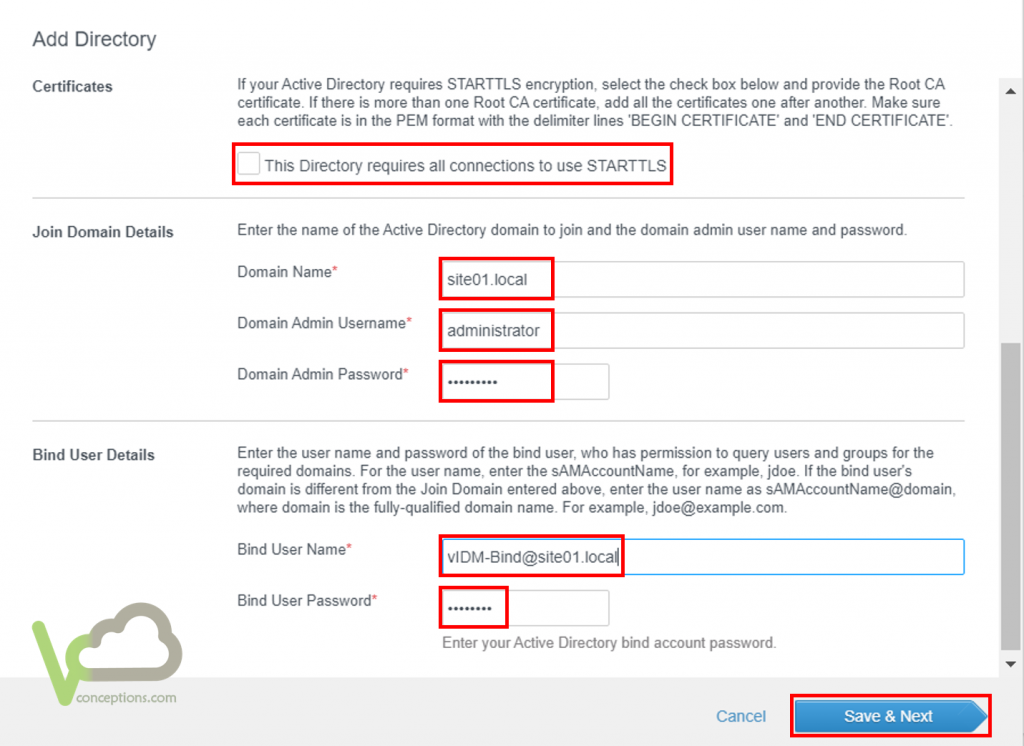
leave Certificate unselected and provide domain credentials to join vIDM to active directory. for the BIND username, you need to specify an account that has the following permissions.
- Read
- Read All Properties
- Read Permissions
provide the credentials and click save and exit.
you should now have the new directory listed in the Directories section.

Now, you need to give users and groups Distinguished Name to allow the vIDM sync users and group. Click on Sync Now, an then give the DN for both users and groups.

enter Groups’ DN and select Sync nested Group members if it suits your need.

also enter Users DN, you can have a filter to exclude some users from syncing.

now hit Sync Directory to start the synchronization.
We have covered how vRealize Automation authentication and authorization function, also how you can integrate Active Directory with vIDM and synchronize users and groups.
I hope this’s been informative for you.