Up until now we have covered how the infrastructure is configured and prepared to be able to allow the end users to use it. Tasks that all were done in Cloud Assembly, great choice of name. Basically now it’s the time to give our customers an opportunity to connect to this infrastructure to use and provision resources from what they are entitled to. For that purpose, Service Broker, another component of vRA is used.

Actually Service Broker is a simplified user interface that allows users to access their self-service catalog. Self-service catalog includes all the entitlements the user has and can be Cloud Templates, Extensibility actions, and Amazon CloudFormation templates, basically everything that can be deployed by the user is considered as catalog items.

Let’s see what happens from the user perspectives. The user will log on to vRA through Identity Manager and depending on the privileges assigned, they can see and do different things. In Service Broker there are three different roles:
- Service Broker Administrator
- Service Broker User
- Service Broker Viewer
Roles in vRA have been described in another post, please take a look at here if interested. In previous parts, we created a Cloud Template in Cloud Assembly through YAML coding which gives you the possibility to provision resources from the underlying infrastructure. To be able to give selected users this ability, you need to have the Cloud Template released.
Release the Cloud Template
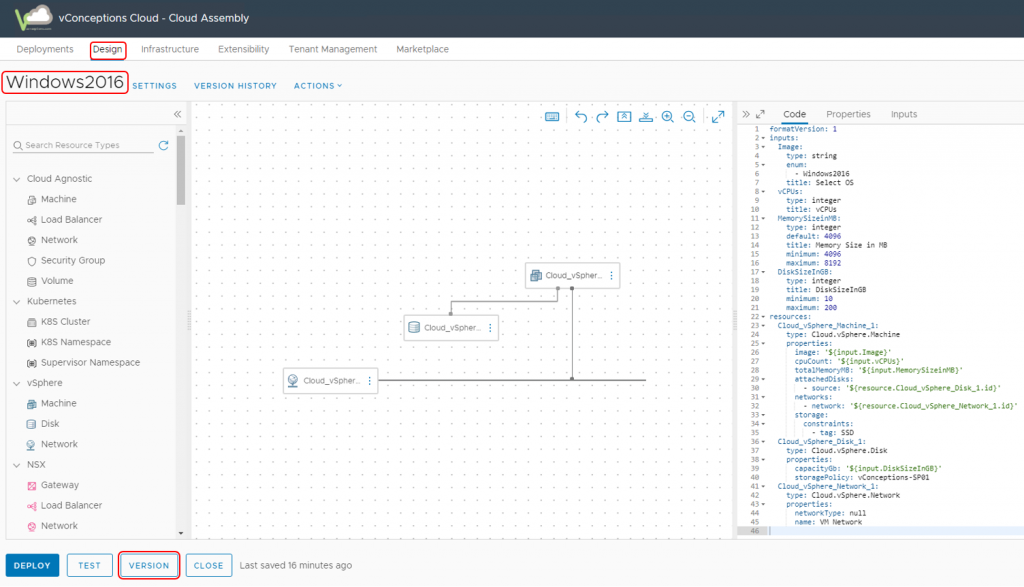
In Cloud Assembly, Under Design tab, click one of the Cloud Templates you like to release.

Then click the Version button on the left corner of the screen.

You can version the Cloud Template and put your change log as well. There is also a checkbox giving you the ability to release this Cloud Template, check and hit Create button.

Import Released Cloud Templates
The next step is to import previously released Cloud Template to Service Broker. In Service Broker, under Content & Policies tab, click the +NEW button.

Select VMware Cloud Templates, you can see that there are other options as well.

Provide a name and description and select the Project you want to import from, then hit VALIDATE to verify everything is fine with no problems. In the end hit CREATE & IMPORT button.

Share the Imported Content
Lastly, you need to share the contents with your desired Project. For that, under Content & Policies, click Content Sharing, then select your desired Project and hit +ADD ITEMS button.

Now select what we created before, you can see that there are two Cloud Templates associated with the content source, click save to finish.

We have successfully created catalog items, not under Service Broker, in Catalog tab you can see that there are two catalog items as depicted below.

Let’s review what the user expects. The user logs on and gets to Service Broker, and under published catalog items, They can submit their request by hitting the REQUEST button and depending on the configuration, they need to provide some inputs. But the question is, are they allowed to submit as many request as they desire? Is there any way to control what they can do? The answer is a Yes.
Policies
There are three different policies:
- Approval Policy
- Day 2 Actions Policy
- Lease Policy
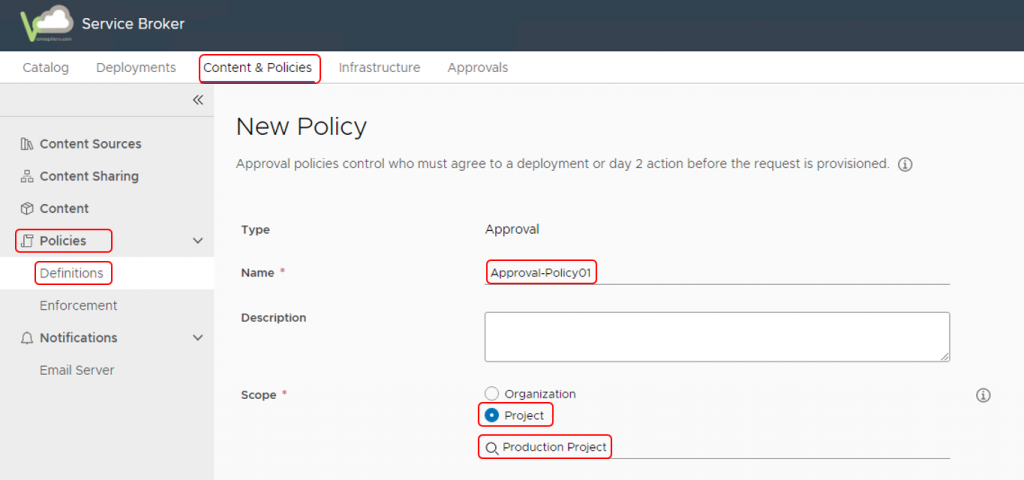
An Approval Policy as the name suggests is used to approve/reject a request. under Content & Policies, in Policies select Definitions and hit +NEW Policy button.

Select Approval Policy.

Give a name and description and then specify the scope of the policy. Weather it is applied organization-wide or project wide, if the project is selected you need to specify the project name either.

Deployment Criteria
As you can see in the picture above, all the requests in the project “Production Project” require the approval. But you as the administrator want to exclude some. Consequently you should consider Deployment Criteria. For instance, in the following example, if the catalog item is “test-blueprint” the policy is not applied. The same thing happens if the number of vCPUs is less than 3, or the memory is less than 4096 MB. You see that you can select between AND/OR operators, meaning if “OR” is used one condition out of all should be met, if “AND” is used, all the conditions have to be met. This is pretty useful when certain requests are not a good candidate for approval policy.

Approver Mode
In the Approver Mode, if “All” is selected, it means all the Approvers have to respond and approve the request. You can guess that if “Any” is selected, only one of the approvers answer is enough.
Approvers
Select the user account/accounts that need to have the approval authority.
Auto Expiry Trigger and Decision
In the following example if 2 days have passed after the request has been submitted with no approvers’ response, it is considered as expired. What to do if a request is expired? This is where the Auto expiry decision is considered, in the following example it will be approved, but you can select Reject too.
Actions
For what sort of actions do you want the policy applied? here I have selected certain deployment actions. Click create to finish.

In the next part, we will examine the other two policy types. We will also submit a request and see it in action.
This post is a part of a blogpost series on vRealize Automation, if you haven’t had a chance to take a look, please go ahead an visit it here.
I hope this’s been informative for you.

